Creating and managing user accounts is easy in Windows 10. After creating user accounts, you can enable or disable user accounts, add or remove user account passwords, and delete user accounts with ease.
Some users want to rename their existing user accounts for some reason. They want to rename user accounts without deleting the existing one or creating a new one. Luckily, there is a way to rename user accounts in Windows 10 without losing data or creating a new user account.
The catch is that this method doesn’t work for Microsoft accounts. Since Microsoft account is not a local user account, Windows 10 will continue to show your actual Microsoft account name on the login screen and other areas of the operating system even after renaming the account in Computer Management. If you want to rename Microsoft accounts, please refer to our how to rename Microsoft accounts guide.
That said, this method works great for local user accounts. You can easily rename local user accounts.
In this guide, we will give you step-by-step directions to rename a local user account in Windows 10.
Method 1 of 2
Rename local user accounts in Windows 10 Pro and above
NOTE: Local Users and Groups is not available in Windows 10 Home edition. If you are on Windows 10 Home edition, please refer to the directions in Method 2.
Step 1: Open Computer Management. The easiest way is to right-click on the Start button on the taskbar and then click Computer Management.
Step 2: In the left-pane of Computer Management window, expand Local users and groups folder to see Users and Groups folders. Click on Users folder.
Step 3: All users accounts on your PC will now appear on the right-side. To rename a user account, right-click on a user account in the list and then click Rename option.
Enter a new name for the user account. That’s it!
Alternatively, right-click on the user account that you want to rename and then click Properties. In the Properties dialog, under the General tab, enter a new name for your account and type description for the user account. Finally, click Apply.
Method 2 of 2
Rename local user accounts in Windows 10 Home
Although Local Users and Groups is not present in Windows 10 Home, you can use the classic Control Panel to rename local user accounts in Windows 10.
Step 1: Sign-in to the user account that you want to rename.
Step 2: Type Control Panel in Start/taskbar search box and then press Enter key to open Control Panel. You can refer our five ways to open Control Panel in Windows 10 guide to know all the ways out there to open Control Panel in Windows 10.
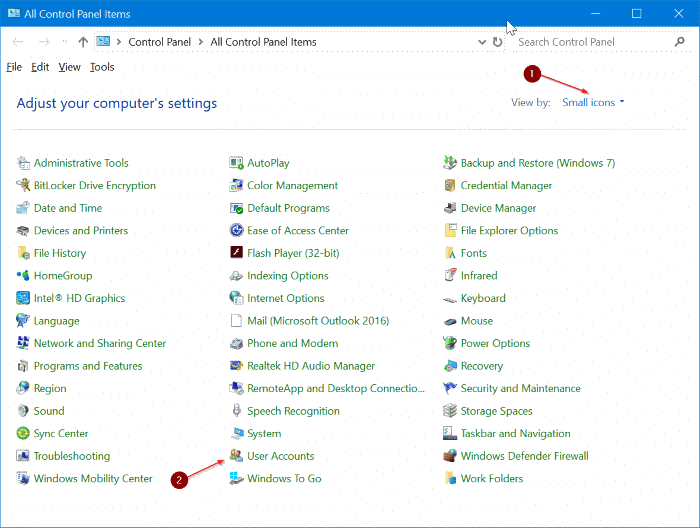
Step 3: Change the View by to Small icons, and then click User Accounts.
Step 4: Click Change the account name link. If you are asked to enter the admin password, please enter the same.
Step 5: Finally, enter a new name for your user account. Click Apply button.
That’s all!


MW says
Please deprecate this answer and stop confusing people, this method only appends user account info on top of what is already there and part of the original account data remains on the system
julian says
doesnt even work smh, doesnt have an option to change account name
earl says
despite doing this, it just adds my name to the original fucking account name,, and it still lists the it under the original user name, when you look it up under this pc, the fuck is wrong with you guys, sheesh cant do something so fucking simple,
Justine-Paula Robilliard says
I have the same issue, I want to to change the user account in Windows Explorer from the 5 letter I assume is the first 5 letters of my name to the full 7 letters, as it is now with the 5 letters, very annoying….
I wiped my hard drive and erased the hard drive, from what I can gather, it has used the first 5 letters of my email address for the users..this pc-locla disk-users-[my name only 5 letters long not 7]…
christopher says
yes but changing this does not change the name of the user’s folder when viewing it in File Explorer. For example, I got a new laptop, and created my username as my first name + surname. When copying all my documents from my old laptop, which contain program files that link to drawings/documents with absolute paths in the folder structure, I realised that my username on my old laptop was just my first name. I need to match the folder names in my new laptop otherwise all these paths will be broken. But your instructions still leave this foldername unchanged in the User folder, and I cant see a way to change it. Please advise, thank you.
harsha says
perfect..clean and crystal clear explanation..thanks a milllion